Migrating from Bash to Zsh on macOS
Migrating to Zsh took some effort, but in retrospect, I am very happy with this decision. As someone who uses the terminal a lot, having a good shell that is tailored to my needs has a significant impact on my productivity.
Due to the fact that Zsh is highly customizable, there probably won’t be two setups that look exactly the same, so instead of giving a detailed guide, I will rather point to the guides that I used and try to “connect the dots”.
In general, the available guides are quite good, but sometimes it isn’t obvious how to connect the different bits and pieces and there are a few things that could have saved me some time if I had known them in advance.
Setting up the terminal
For starters, I strongly recommend installing iTerm2. It isn’t a requirement, but the RGB color support in iTerm2 will allow for using much more pleasant theme settings.
I added my own profile (making it the default profile), where I made a few special settings:
In the “General” tab, I set the command to “Custom Shell” and the path to “/bin/zsh”. This way, I could enable Zsh for iTerm2 without having to change the shell associated with my user. This makes the setup process easier because you can still simply start a regular Terminal using Bash.
For the “Working Directory” I use an “Advanced Configuration” where I use the home directory for new windows and reuse the previous sessions’s directory for new tabs and new split panes. This pretty much mimics the behavior also seen in macOS’s built-in Terminal app.
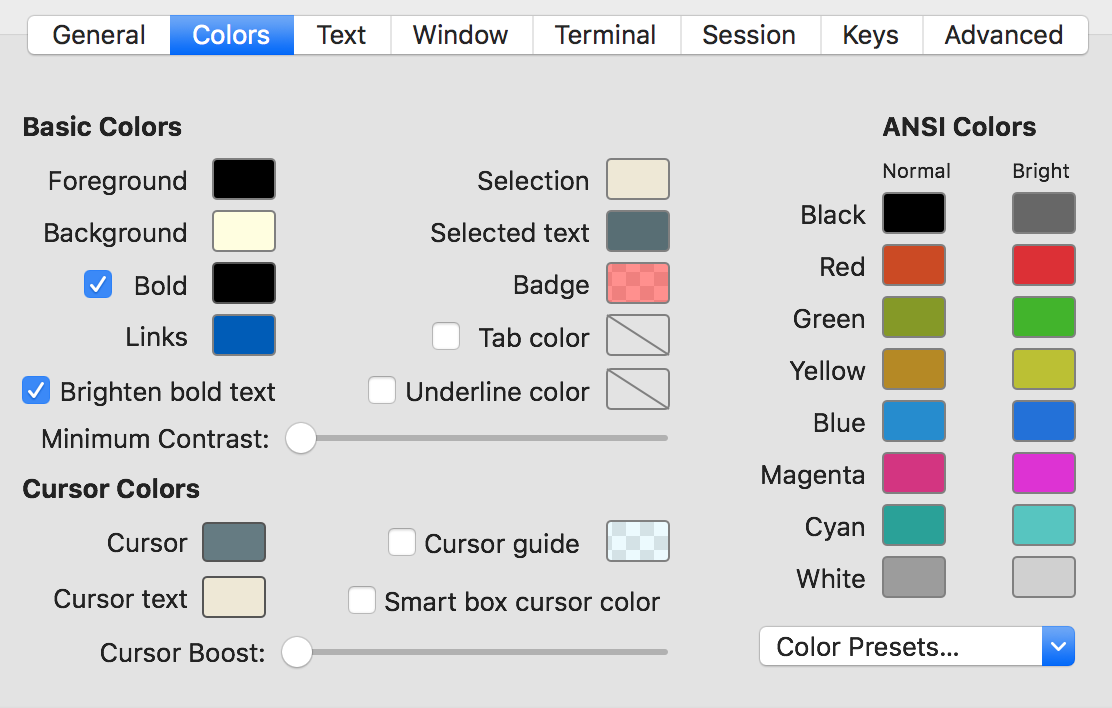
There are several color presets, but none of them were to my liking. I prefer black text on a bright yellow (not white!) background because this combination is less stressful for my eyes than black on white or white on black. So I created my own color preset that you can see in the screenshot.
 In theory, you can use any font, but there are significant benefits to using a font that has been patched with the Nerd Font glyphs. I used the “Hack” font before and wanted to keep using it, but the patched version of Hack is not available from the Nerd Font website. Luckily, additional patched fonts (including Hack) are available for the Nerd Font GitHub repository. You will need the “Nerd Font Complete Mono” variants of your preferred font and they should be installed in the bold, bold-italic, italic, and regular variants.
After installing the font, you can select it on the “Text” tab of the iTerm2 profile settings.
There are more settings in iTerm2 and you might want to explore them when you have time, but the mentioned settings were there ones that were most critical to me.
Installing Oh my Zsh and Powerlevel10k
After having configured the Terminal, we can continue with installing Oh my Zsh. Oh my Zsh is a collection of themes and plugins for Zsh that can significantly boost your experience. The documentation on GitHub is quite good, so I won’t describe the process in detail.
I like the Powerlevel10k theme that unfortunately is not part of Oh My Zsh. However, the GitHub repository contains a guide on installing and configuring it. The Powerlevel10k theme is the reason why we went through the hassle of installing iTerm2 and a custom font earlier. With these two prerequisites being met, we can get the most out of Powerlevel10k.
Powerlevel10k comes with its own configuration wizard, so I will only tell you which settings I chose and why I chose them this way. The wizard will first ask you a couple of questions about whether you can see certain glyphs. If the correct font has been installed and selected, you should be able to answer “yes” to all these questions.
When asked for the prompt style, I used the “classic” style. To me, it is the most visually appealing one and it has sufficient contrast to be well readable (though this might depend on your color scheme). In the next step I chose the “Unicode” character set because with proper fonts installed, there is no reason to restrict oneself to ASCII.
For the prompt color, there really is no “right” answer. It entirely depends on which style provides you with the best contrast so that the text is readable.
I did not enable the “show current time” option because to me it does not really add any benefit and takes up a lot of space.
For the prompt separators, I chose the “angled” version, but again this really just comes down to personal taste. It’s the same with the prompt heads, where I prefer the “sharp” version and the prompt tails where I prefer the “flat” version.
The prompt height is a different story. Initially, I started with the “one line” option, but soon I changed to “two lines”. While this feels strange at first, the advantage becomes apparent when you see how many information Powerlevel10k provides as part of the prompt. So you really want all space that you can get.
For the prompt connection, I chose “disconnected”, but again that’s rather a question of personal taste. I enabled the “full” prompt frame because to me this makes it visually clearer that the prompt really spans two lines.
I chose the “compact” prompt spacing, but in combination with an option later in the wizard, it doesn’t make a big difference. I also enabled the “many icons” option because I think that icons are a great way to encode information in the prompt.
For the prompt flow, I chose the “fluent“ option, but I am currently thinking about switching to the “concise” option in order to save some space.
I strongly recommend enabling the “transient prompt” option. Together with the “two lines” prompt, it gives you the best of both worlds: You can have a lot of space in your prompt, but still when you scroll up, there will only be one line per command, so the history is concise.
Finally, for the instant prompt mode I went with the recommended “verbose” option that has served me well so far.
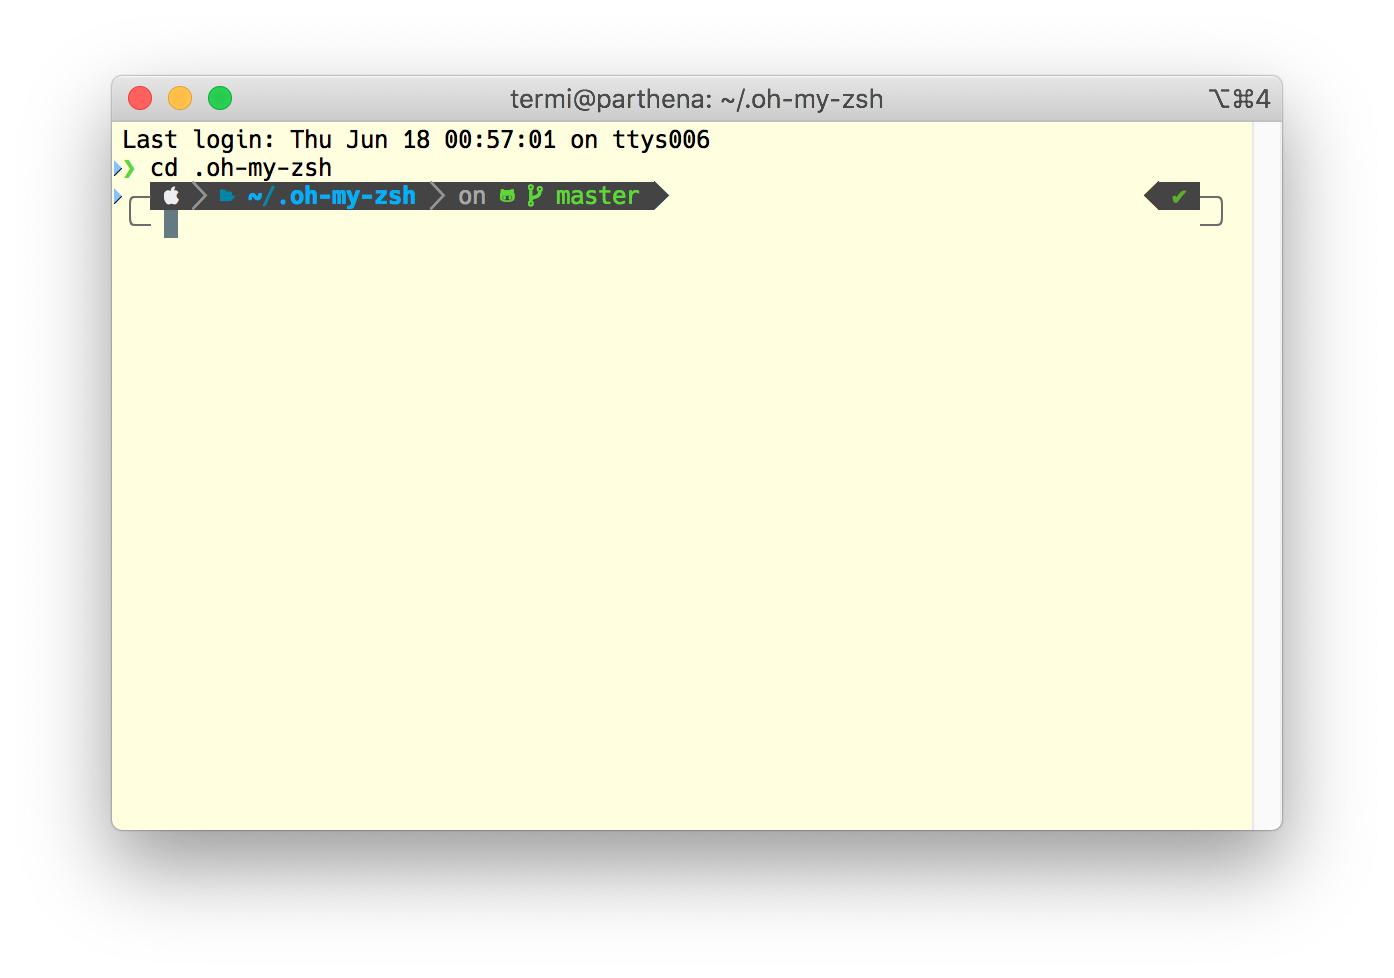
The resulting prompt looks like this:
 The only manual change that I made to the generated
 .p10k.zsh was adding svn to the list of POWERLEVEL9K_VCS_BACKENDS. I still use Subversion a lot and wanted to profit from having information about the working copy as part of the prompt. There is a warning about potential impacts on performance, but I didn’t notice any performance issues when the Subversion support is enabled.
Oh my Zsh plugins
Finally, I enabled a few plugins from Oh My Zsh. These plugins can be quite useful. You might want to take a look at the full list of available plugins and decide for yourself which ones you find useful.
The “bgnotify” plugin sends a notification when a command takes more than a configurable amount of time to complete. This is very useful when, for example, you start a build process and then switch to another application (e.g. in order to read e-mails while you are waiting for the build to finish). This plugin will send a notification when the command has finished so that you know that you can go back to working on the project.
The “command-not-found” plugin is just a small helper that can help you with figuring out how to install a certain command if it has not been found.
The “copydir” plugin adds a copydir command that you can run in order to copy the current working directory to the system clipboard. This can be handy if you want to paste the path in some other application (e.g. an integrated development environment).
The “dirhistory” plugin allows you to quickly navigate through the directory hierarchy with key strokes. For example, going one level in the directory hierarchy is as simple as hitting ⌥⃣ + ↑⃣. And going back to the last working directory can be achieved by pressing ⌥⃣ + ←⃣.
The “git” plugin provides some support for using Git (e.g. auto-completion).
The “per-directory-history” plugin is incredibly useful. It safes the history of commands separately for each directory. So when you are switching between working on different projects, the commands used in one project will not clutter the history of commands for a different project.
Unfortunately, there as of the time of writing this, there is a bug in this plugin, that limits its usefulness. Luckily, I fixed this bug and the patch has already been accepted upstream, so hopefully, it will soon find it’s way into Oh My Zsh as well.
The “safe-paste” plugin provides protection against accidentally pasting something into the terminal that you didn’t really want to run as commands. However, iTerm2 has a similar feature, so it is not that important when you use iTerm2.
Finally, the “z” plugin keeps a history of your working directories. When you want to switch to a working directory that you have been using before, you can run z directory-name and the plugin will automatically choose the best matching directory.
With this combination of Powerlevel10k theme and plugins, Zsh is an incredibly useful working environment to me and I do really not regret abandoning Bash.
Further steps
You might have custom code in your .bash_profile. You will have to copy this code over to .zshrc.
I didn’t like the completion behavior of Zsh (cycling through possible completions when hitting tab twice), so I restored the behavior known from bash by adding
setopt noautomenu
to my .zshrc.
