Skip to content

Certificate validation issues in Matomo

When using a certificate for your Matomo host that is not signed by a public CA, you might get a warning message like this on Matomo’s system check page:

Unable to execute check for …: curl_exec: SSL certificate problem: unable to get local issuer certificate. Hostname requested was: …

This happens, even if the CA that signed the server certificate is actually registered as a root CA on the system where Matomo is running.

There is a (at the time of writing) misleading article in the Matomo documentation that suggests setting the curl.cainfo option in php.ini. However, this does not help because Matomo actually overrides this setting with its own bundled list of root CAs (in vendor/composer/ca-bundle/res/cacert.pem).

The correct answer is in another article (which is not so easily found because it refers to a different error message): One has to set the custom_cacert_pem option in the [General] section of Matomo’s config.ini.php.

In my case, I am running Matomo inside a Docker container that is based on Alpine Linux and I have added our internal root CA to the root CA bundle used by most programs in Alpine, so I use the following setting:

[General]
custom_cacert_pem = "/etc/ssl/certs/ca-certificates.crt"

Why does the monthly, daily, hourly option in AWStats not work as expected?

I recently encountered a strange problem in AWStats: In the time-range selector, there is a drop-down field selecting a mode (monthly, daily, or hourly), but when selecting anything except monthly, AWStats would tell me that the statistics had never been updated. This obviously was wrong, because the monthly view worked. So, why did this happen?

The answer is that this field controls the sparsely documented “database break” option of AWStats. This option controls on which level the database files, which are used for the stattistics, are generated. For monthly, one file is generated for each month of each year. For daily, one file is generated for each day of each month, and for hourly, one file is generated for each hour of each day.

However, the CGI (user interface) script does not generate these files, it simply expects them to be present. To generate these files, the correct value for the -DatabaseBreak option needs to be specified when calling AWStats to update the statistics from the log file.

So, if one really wants to use all three modes (monthly, daily, hourly), awstats.pl -update has to be called three times:

awstats.pl -update -DatabaseBreak=month
awstats.pl -update -DatabaseBreak=day
awstats.pl -update -DatabaseBreak=hour

The first line represents the default value for the database break option, so you could use awstats.pl -update instead.

However, be aware that this will create a lot of files, in particular for the hourly option. That’s why I chose to only use monthly statistics and simply remove the selection option from the HTML of the user interface (in order to avoid user confusion). In fact, according to the AWStats change log, this option was only added to the user interface in version 7.8. If you want to remove it, find the following lines in the awstats.pl script and remove them:

			print "<select class=\"aws_formfield\" name=\"databasebreak\">\n";
			print "<option"
			  . ( $DatabaseBreak eq "month" ? " selected=\"selected\"" : "" )
			  . " value=\"month\">Monthly</option>\n";
			print "<option"
			  . ( $DatabaseBreak eq "day" ? " selected=\"selected\"" : "" )
			  . " value=\"day\">Daily</option>\n";
			print "<option"
			  . ( $DatabaseBreak eq "hour" ? " selected=\"selected\"" : "" )
			  . " value=\"hour\">Hourly</option>\n";
			print "</select>\n";

They can be found in the HTMLTopBanner function.

Fixing zmsaupdate in Zimbra 8.8 Patch 20/21

In Zimbra 8.8 Patch 20 and 21, the zmsaupdate script is broken: Due to an updated version of SpamAssassin, the script fails with the following message:

zmsaupdate: Error code downloading update: 2

This is caused by the sa-update program not accepting the --allowplugins option any longer, so that option simply has to be removed from the script in /opt/zimbra/libexec/zmsaupdate.

Find the following line in the script:

my $sa="/opt/zimbra/common/bin/sa-update -v --allowplugins --refreshmirrors >/dev/null 2>&1";

And change it to:

my $sa="/opt/zimbra/common/bin/sa-update -v --refreshmirrors >/dev/null 2>&1";

This will fix the problem.

Duplicate DHCP leases when cloning a Ubuntu 20.04 LTS virtual machine

When cloning a Ubuntu 20.04 LTS VM inside Parallels Desktop, I saw some strange behavior: The cloned VM would get the same IP address from Parallels Desktop’s DHCP server as the original VM.

First, I thought that the DHCP lease file might be persisted somewhere, but this turned out to be wrong. Next I stumbled upon a bug report in the Parallels forum, which suggested that Parallels Desktop might hand out duplicate DHCP leases for cloned VMs under certain circumstances, but this turned out to be a wrong lead as well.

In the end, the problem is that in Ubuntu 20.04 LTS (in contrast to older versions), the network interface’s MAC address is not used as the DHCP client identifier any longer. Instead, the system’s machine ID is used.

When cloning a VM, Parallels Desktop assigns new MAC addresses to all interfaces of the VM, but it doesn’t change the VM’s UUID. In order to ensure that the cloned VM has it’s own system UUID, one has to edit the config.pvs file inside the cloned VMs directory and change the content of the <SourceVmUuid> tag to match the content of the <VmUuid> tag (instead of the content of the <VmUuid> tag of the original VM).

Unfortunately, the machine ID is also stored in a file inside the VMs file system, so after changing it in the VM’s configuration, one has to boot into the VM and do the following steps:

sudo rm /etc/machine-id
sudo systemd-machine-id-setup
reboot

After rebooting, the system should use the new machine ID.

Update (December 11, 2020): I had written to the Parallels support when I experienced this issue and even though I basically figured it out on my own, they now provided me with a link to a knowledge base article that describes a slightly nicer way of changing a virtual machine’s UUID. I still think that they could simply provide a button for this somewhere in the VM settings, but hey, what do I know…

Migrating from Bash to Zsh on macOS

Recently, I migrated from Bash to Z Shell on macOS. The trigger was that since macOS 10.15, Zsh is the default shell and Bash has been behind on macOS (still being stuck on version 3.2) for years.

Migrating to Zsh took some effort, but in retrospect, I am very happy with this decision. As someone who uses the terminal a lot, having a good shell that is tailored to my needs has a significant impact on my productivity.

Due to the fact that Zsh is highly customizable, there probably won’t be two setups that look exactly the same, so instead of giving a detailed guide, I will rather point to the guides that I used and try to “connect the dots”.

In general, the available guides are quite good, but sometimes it isn’t obvious how to connect the different bits and pieces and there are a few things that could have saved me some time if I had known them in advance.

Setting up the terminal

For starters, I strongly recommend installing iTerm2. It isn’t a requirement, but the RGB color support in iTerm2 will allow for using much more pleasant theme settings.

I added my own profile (making it the default profile), where I made a few special settings:

In the “General” tab, I set the command to “Custom Shell” and the path to “/bin/zsh”. This way, I could enable Zsh for iTerm2 without having to change the shell associated with my user. This makes the setup process easier because you can still simply start a regular Terminal using Bash.

For the “Working Directory” I use an “Advanced Configuration” where I use the home directory for new windows and reuse the previous sessions’s directory for new tabs and new split panes. This pretty much mimics the behavior also seen in macOS’s built-in Terminal app.

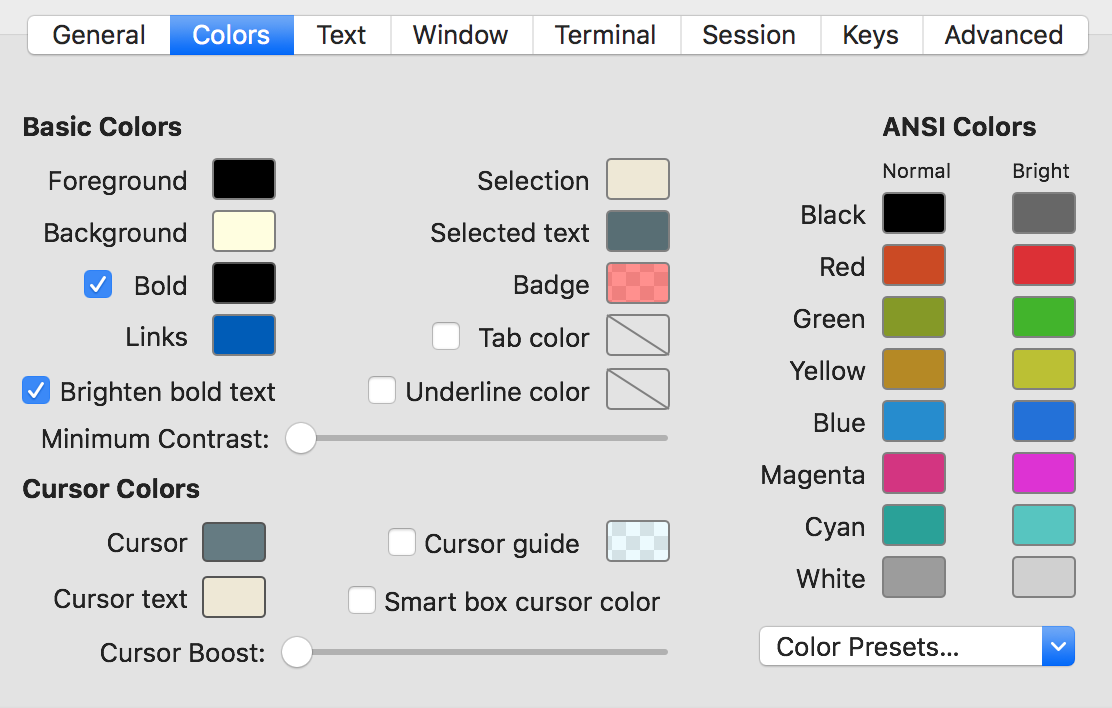
There are several color presets, but none of them were to my liking. I prefer black text on a bright yellow (not white!) background because this combination is less stressful for my eyes than black on white or white on black. So I created my own color preset that you can see in the screenshot.

Screenshot of the color tab in the iTerm2 profile settingsIn theory, you can use any font, but there are significant benefits to using a font that has been patched with the Nerd Font glyphs. I used the “Hack” font before and wanted to keep using it, but the patched version of Hack is not available from the Nerd Font website. Luckily, additional patched fonts (including Hack) are available for the Nerd Font GitHub repository. You will need the “Nerd Font Complete Mono” variants of your preferred font and they should be installed in the bold, bold-italic, italic, and regular variants.

After installing the font, you can select it on the “Text” tab of the iTerm2 profile settings.

There are more settings in iTerm2 and you might want to explore them when you have time, but the mentioned settings were there ones that were most critical to me.

Installing Oh my Zsh and Powerlevel10k

After having configured the Terminal, we can continue with installing Oh my Zsh. Oh my Zsh is a collection of themes and plugins for Zsh that can significantly boost your experience. The documentation on GitHub is quite good, so I won’t describe the process in detail.

I like the Powerlevel10k theme that unfortunately is not part of Oh My Zsh. However, the GitHub repository contains a guide on installing and configuring it. The Powerlevel10k theme is the reason why we went through the hassle of installing iTerm2 and a custom font earlier. With these two prerequisites being met, we can get the most out of Powerlevel10k.

Powerlevel10k comes with its own configuration wizard, so I will only tell you which settings I chose and why I chose them this way. The wizard will first ask you a couple of questions about whether you can see certain glyphs. If the correct font has been installed and selected, you should be able to answer “yes” to all these questions.

When asked for the prompt style, I used the “classic” style. To me, it is the most visually appealing one and it has sufficient contrast to be well readable (though this might depend on your color scheme). In the next step I chose the “Unicode” character set because with proper fonts installed, there is no reason to restrict oneself to ASCII.

For the prompt color, there really is no “right” answer. It entirely depends on which style provides you with the best contrast so that the text is readable.

I did not enable the “show current time” option because to me it does not really add any benefit and takes up a lot of space.

For the prompt separators, I chose the “angled” version, but again this really just comes down to personal taste. It’s the same with the prompt heads, where I prefer the “sharp” version and the prompt tails where I prefer the “flat” version.

The prompt height is a different story. Initially, I started with the “one line” option, but soon I changed to “two lines”. While this feels strange at first, the advantage becomes apparent when you see how many information Powerlevel10k provides as part of the prompt. So you really want all space that you can get.

For the prompt connection, I chose “disconnected”, but again that’s rather a question of personal taste. I enabled the “full” prompt frame because to me this makes it visually clearer that the prompt really spans two lines.

I chose the “compact” prompt spacing, but in combination with an option later in the wizard, it doesn’t make a big difference. I also enabled the “many icons” option because I think that icons are a great way to encode information in the prompt.

For the prompt flow, I chose the “fluent“ option, but I am currently thinking about switching to the “concise” option in order to save some space.

I strongly recommend enabling the “transient prompt” option. Together with the “two lines” prompt, it gives you the best of both worlds: You can have a lot of space in your prompt, but still when you scroll up, there will only be one line per command, so the history is concise.

Finally, for the instant prompt mode I went with the recommended “verbose” option that has served me well so far.

The resulting prompt looks like this:

Screenshot of the final setup of Zsh with Powerlevel10k
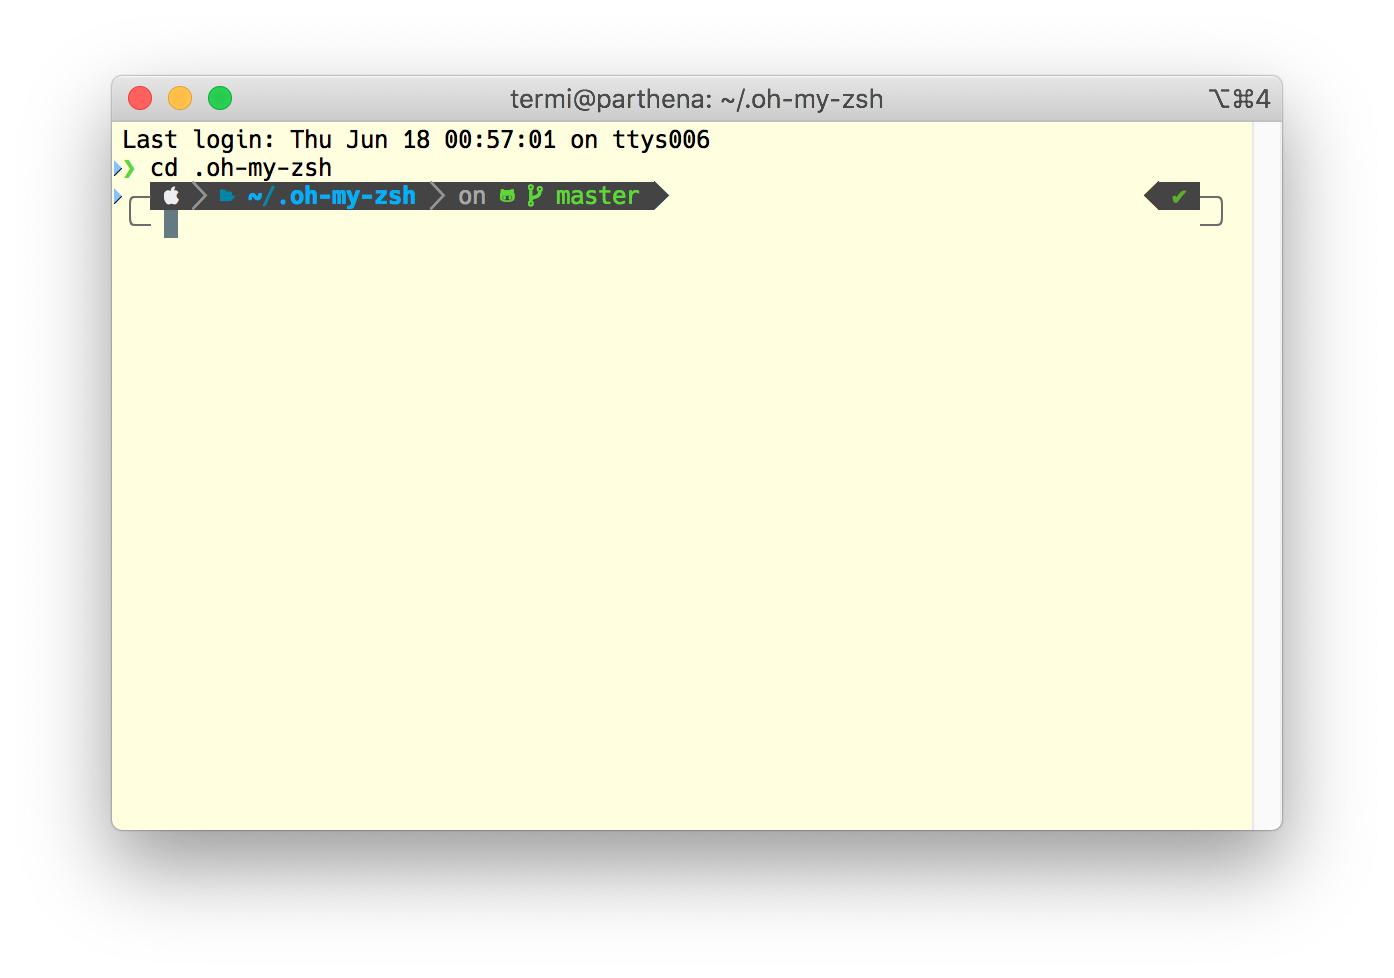
The only manual change that I made to the generated .p10k.zsh was adding svn to the list of POWERLEVEL9K_VCS_BACKENDS. I still use Subversion a lot and wanted to profit from having information about the working copy as part of the prompt. There is a warning about potential impacts on performance, but I didn’t notice any performance issues when the Subversion support is enabled.

Oh my Zsh plugins

Finally, I enabled a few plugins from Oh My Zsh. These plugins can be quite useful. You might want to take a look at the full list of available plugins and decide for yourself which ones you find useful.

The “bgnotify” plugin sends a notification when a command takes more than a configurable amount of time to complete. This is very useful when, for example, you start a build process and then switch to another application (e.g. in order to read e-mails while you are waiting for the build to finish). This plugin will send a notification when the command has finished so that you know that you can go back to working on the project.

The “command-not-found” plugin is just a small helper that can help you with figuring out how to install a certain command if it has not been found.

The “copydir” plugin adds a copydir command that you can run in order to copy the current working directory to the system clipboard. This can be handy if you want to paste the path in some other application (e.g. an integrated development environment).

The “dirhistory” plugin allows you to quickly navigate through the directory hierarchy with key strokes. For example, going one level in the directory hierarchy is as simple as hitting ⌥⃣ + ↑⃣. And going back to the last working directory can be achieved by pressing ⌥⃣ + ←⃣.

The “git” plugin provides some support for using Git (e.g. auto-completion).

The “per-directory-history” plugin is incredibly useful. It safes the history of commands separately for each directory. So when you are switching between working on different projects, the commands used in one project will not clutter the history of commands for a different project.

Unfortunately, there as of the time of writing this, there is a bug in this plugin, that limits its usefulness. Luckily, I fixed this bug and the patch has already been accepted upstream, so hopefully, it will soon find it’s way into Oh My Zsh as well.

The “safe-paste” plugin provides protection against accidentally pasting something into the terminal that you didn’t really want to run as commands. However, iTerm2 has a similar feature, so it is not that important when you use iTerm2.

Finally, the “z” plugin keeps a history of your working directories. When you want to switch to a working directory that you have been using before, you can run z directory-name and the plugin will automatically choose the best matching directory.

With this combination of Powerlevel10k theme and plugins, Zsh is an incredibly useful working environment to me and I do really not regret abandoning Bash.

Further steps

You might have custom code in your .bash_profile. You will have to copy this code over to .zshrc.

I didn’t like the completion behavior of Zsh (cycling through possible completions when hitting tab twice), so I restored the behavior known from bash by adding

setopt noautomenu

to my .zshrc.

Apt: Writing more data than expected

If apt (apt-get, aptitude, etc.) fails with an error message like

Get:1 http://example.com/ubuntu xenial/main amd64 python-tornado amd64 4.2.1-2~ds+1 [275 kB]
Err:1 http://example.com/ubuntu xenial/main amd64 python-tornado amd64 4.2.1-2~ds+1
  Writing more data than expected (275122 > 275100)

but the file in the repository has the expected size, a caching proxy (e.g. Apt-Cacher-NG) might be at fault. This can happen when the package in the repository has been changed instead of releasing a new package with a new version number. This will typically not happen for the official repositories, but it might happen for third-party repositories.

In this case, there are only two solutions: Bypass the proxy or remove the old file from the proxy's cache. In the case of Apt-Cacher-NG, this can be achived by going to the web interface, checking the “Validate by file name AND file directory (use with care),” and “then validate file contents through checksum (SLOW), also detecting corrupt files,” options and clicking “Start Scan and/or Expiration”. This scan should detect the broken packages, which can then be selected by checking “Tag” next to each package and subsequently deleted by clicking “Delete selected files”.

Using CRLs in Icinga 2

Icinga 2.x offers a cluster mode which (from an administrator's point of view) is one of the most important features introduces with the 2.x release. Using the cluster feature, check commands can be executed on satellite nodes or even the complete scheduling of checks can be delegated to other nodes, while still keeping the configuration in a single place.

In order to enable secure communication within the cluster, Icinga 2 uses a public key infrastructure (PKI). This PKI can be managed with the icinga2 pki commands. However, there is no command for generating a CRL. For this reason, it is necessary to use the openssl ca command for generating a CRL. I have documented the steps necessary for generating a CRL in my wiki.

Funnily, it seems like no one has used a CRL in Icinga 2 so far. I know this, because up to today, Icinga 2 has a bug that makes it impossible to load a CRL. Luckily, yours truly already fixed this bug and this bugfix is going to be included in the next Icinga 2 release.

I find it strange that obviously no one is using CRLs, because Icinga 2 uses a very long validity period when generating certificates (15 years), so it is quite likely that at some point a node is decommissioned and thus the corresponding certificate shall be removed.

Design flaws of the Linux page cache

Like most modern operating systems, Linux has a page cache. This means that when reading from or writing to a file, the data is actually cached in the system’s memory, so that subsequent read requests can be served much faster, without having to access the non-volatile storage.

This is an extremely useful facility, which has a huge impact on system performance. For typical workloads, a significant amount of data is used repeatedly and caching this data reduces the latency dramatically. For example, imagine that every time you ran “ls”, the executable would actually be read from the hard disk. This would undoubtedly make the interactive experience much less responsive.

Unfortunately, there is a downside to how Linux caches file-system data: As long as there is free system memory, the caching is a no-brainer and simply caching everything works perfectly. After some time however, the system memory will be used completely and the kernel has to decide how to free memory in order to cache I/O data. Basically, Linux will evict old data from the cache and even move process data to the swap area in order to make space for data newly arriving in the cache. In most cases, this makes sense: If data has not been used for some time (even data that is not from a disk but belongs to a process which simply has not needed it in some time), it makes sense to evict it from the cache or put it into the swap area so that the fast memory can be used for fresh data that is more likely to be needed again soon. Most times, these heuristics work great, but there is one big exception: Processes that read or write a lot of data, but only do so once.

For example, imagine a backup process. A backup process will read nearly all data stored on disk (and maybe write it to an archive file), but caching the data from this read or write operations does not make a lot of sense because it is not very likely to be accessed again soon (at least not more likely than if the backup process did not run at all). However, the Linux page cache will still cache that data and move other data out of memory. Now, accessing that data again will result in slow read requests from the hardware, effectively slowing the system down, sometimes to a point that is worse than if the page cache had been disabled completely.

For a long time, I never thought about this problem. In retrospect, systems sometimes seemed slow after running a backup, but I never connected the dots until recently I started to see a problem that looked weird at first: Every night, I got an e-mail from the Icinga monitoring system warning me about the swap space on two (very similar) systems running extremely low. First, I expected that some nightly maintenance problem might simply need a lot of memory (I recently had installed a software upgrade on these systems), so I assigned more memory to the virtual machines. I expected that the amount of free swap space would increase by the amount of extra memory assigned, but it did not. The swap space was still used almost completely. Therefore, I looked at the memory consumption while the problem was present, and the result was astonishing: Both memory and swap were virtually fully used, but about 90 percent of the memory was actually used by the page cache, not by any process.

Investigating the problem closer revelealed that the high usage of swap space always occurred shortly after the nightly backup process started running. To be absolutely sure, I manually started the process during the day and I could immediately see the page cache and swap usage growing rapidly. It was clear that the backup process reading a lot of data was responsible for the problem. If you think about it, this is not the kernel’s fault: It simply cannot know that the data will not be needed again and moving other data out of the way is actually counter productive.

So everything that is needed to fix this kind of problem is a way to tell the kernel “please do not cache the data that I read, I will not need it again anyway”. While this sounds simple, it actually is a huge problem with current kernel releases.

There is no way to tell the kernel “do not cache the data accessed by this process”. In fact, there are only four ways for influencing the caching behavior that I am aware of:

  1. The page cache can be disabled globally for the time of running the backup process. While it might alleviate the impact of the problem, it is still not desirable because the page cache actually is useful and disabling it will have a negative impact on system performance. However, during the backup process, disabling the page cache might still result in better performance than not doing anything at all.
  2. Some suggest mounting the file-system with the “sync” flag. However, this will only circumvent the page cache for write requests, not for read requests. It also has very negative impacts on performance, so I only list it here because it is suggested by some people.
  3. The files can be opened with the O_DIRECT flag. This tells the kernel that I/O should bypass the caches. Unfortunately, using O_DIRECT has a lot of side effects. In particular, the size and offset of the memory buffer used for I/O operations has to match certain alignment restrictions that depend on the Kernel version used and the file-system type. There is no API for querying these restrictions, so one can only choose alignment to a rather large size and hope that it is sufficient. Of couse, this also means that simply modifying the code of an application that opens a file is not sufficient. Every piece of code that reads from or writes to a file has to be changed so that it matches the alignment restrictions. This definitely is not an easy task, so using O_DIRECT is more of a theoretical approach.
  4. Last but not least, there is the posix_fadvise function. This function allows a program in user space to tell the kernel how it is going to use a file (e.g. read it sequentially), so that the kernel can optimize things like the file-system cache. There are two flags that can be passed to this function which sound particularly promising: According to the man page, the POSIX_FADV_NOREUSE flag specifies that “the specified data will be accessed only once” and the POSIX_FADV_DONTNEED flag specifies that “the specified data will not be accessed in the near future”.

So it sounds like posix_fadvise can solve the problem and all we need to do is find a way to tell the program (tar in my case) to call it. As it turns out, there even is a small tool called “nocache” that acts as a wrapper around arbitrary programs and uses the LD_PRELOAD mechanism to catch attempts to open a file and adds POSIX_FADV_NOREUSE right after opening the file.

This would be the perfect solution if the Linux kernel actually cared about POSIX_FADV_NOREUSE. Unfortunately, till this day, it simply ignores this flag. In 2011, there was a patch that tried to add support for this flag to the kernel, but it never made it into the mainline kernel (the reasons are unknown to me).

Actually, the nocache tool is aware of this and adds a workaround: When closing the file, it calls posix_fadvise with the POSIX_FADV_DONTNEED flag. It has to do this when closing the file (instead of when opening it) because POSIX_FADV_DONTNEED only removes data from the page cache, it does not prevent it from being added to the page cache.

So I installed nocache, and wrapped the call to tar with it, expecting that this would finally solve the problem. Surprisingly, it did not. At first, it seemed like the page cache was filling less rapidly, but after a while, everything looked quite like before. I tried to add the “-n” parameter to nocache, telling it to call posix_fadvise multiple times (the documentation suggested to do so), but this did not help either.

After giving this some more thought, I realized why: Using POSIX_FADV_DONTNEED when closing the file works great when working with many small or medium-sized files. For large files, however, it does not work. By the time it is called, all of the file has already been put into the page cache, causing the same problems as when many small files are read without nocache. This means that posix_fadvise has to be called repeatedly while reading from the file to ensure that the amount of data cached never grows too large. While there are only a few API calls for opening files, there are ways for reading from a file (e.g. memory-mapped I/O) that nocache simply cannot catch. This means that the only solution is actually patching the program that is reading or writing data.

This is why I created a patch for GNU tar version 1.29. This patch calls posix_fadvise after reading each block of data and thus ensures that the page cache is never polluted by tar. Unfortunately, this patch is not portable, nor does it provide a command-line argument for enabling or disabling this behavior, so it is not really suitable for inclusion into the general source code of GNU tar. The patch only takes care of not polluting the file-system cache when reading files. It does not do so when writing them, but for me this is sufficient because in my backup script, tar writes to the standard output anyway.

When using this patched version of tar, the memory problems disappear completely. This makes me confident that the change is sufficient, so I am going to use this patched version of tar for all systems that I backup with tar. Unfortunately, I use Bareos for the backup of most systems, so I will have to find a solution for that software, too. Maybe we are lucky, and support for POSIX_FADV_NOREUSE will finally be added to Linux at some point in the future, but until then patching the software involved in the backup process seems like the only feasible way to go.

ISC DHCP server not starting on Ubuntu 16.04 LTS

After upgrading two systems running the ISC DHCP server from Ubuntu 14.04 LTS (Trusty) to Ubuntu 16.04 LTS (Xenial), I experienced some trouble with the DHCP server not starting on system boot. The log file contained the following message:

Internet Systems Consortium DHCP Server 4.3.3
Copyright 2004-2015 Internet Systems Consortium.
All rights reserved.
For info, please visit https://www.isc.org/software/dhcp/
Config file: /etc/dhcp/dhcpd.conf
Database file: /var/lib/dhcp/dhcpd.leases
PID file: /run/dhcp-server/dhcpd.pid
Wrote 0 class decls to leases file.
Wrote 0 deleted host decls to leases file.
Wrote 0 new dynamic host decls to leases file.
Wrote 389 leases to leases file.

No subnet declaration for ovsbr0p1 (no IPv4 addresses).
** Ignoring requests on ovsbr0p1.  If this is not what
   you want, please write a subnet declaration
   in your dhcpd.conf file for the network segment
   to which interface ovsbr0p1 is attached. **


Not configured to listen on any interfaces!

If you think you have received this message due to a bug rather
than a configuration issue please read the section on submitting
bugs on either our web page at www.isc.org or in the README file
before submitting a bug.  These pages explain the proper
process and the information we find helpful for debugging..

exiting.

Obviously the problem was that the DHCP server was started before the network interface ovsbr0p1 (the primary network interface of the host) was brought up. I guessed that this problem was somehow related to the migration from Upstart to Systemd. Still, it was strange because the isc-dhcp-server.service was configured to be started after the network-online.target.

I could not figure out why Systemd though that the network-online.target had been reached before the interface was configured completely, but I found a simple workaround: I added a file /etc/systemd/system/isc-dhcp-server.service.d/retry.conf with the following content:

[Service]
Restart=on-failure
RestartSec=15

This means that the first start of the DHCP server will still fail most of the time, but Systemd will retry 15 seconds later and typically the network interface will be online by then (if it is not, Systemd will try again another 15 seconds later).

Network problems after upgrading to Ubuntu 16.04 LTS

After upgrading a virtual machine from Ubuntu 14.04 LTS to Ubuntu 16.04 LTS, I was getting weird problems with the network configuration. The network would still be brought up, but scripts that were specified in /etc/network/interfaces would not be run when the corresponding interface was brought up.

The logfile /var/log/syslog would contain messages like "ifup: interface eth0 already configured". On other VMs that had also been updated from Ubuntu 14.04 LTS and uses a similar network configuration, this problem would not appear.

I found the solution to this problem in the Ubuntu Forums: There was a file /etc/udev/rules.d/85-ifupdown.rules that caused problems with the network initialization. After deleting this file, the problems went away. I guess that this file was present in a rather old release of Ubuntu and thus the problem only appears when a system has previously been upgraded from that release of Ubuntu.

Disabling the annoying "Visit ..." entry in the Firefox address-bar drop-down - Part 2

Some time ago, I wrote about how to disable the annoying “Visit ...” entry in the Firefox address-bar drop-down.

Unfortunately, this method does not work any longer with Firefox 48. Fortunately, I found an article that give a great overview of the methods that still work with Firefox 48.

I chose the option to install Classic Theme Restorer addon because I felt that this option might be a bit more stable regarding future updates than manually tweaking the CSS.

Open vSwitch and Multicasting

Recently, I noticed the following messages in the system log of a Ubuntu 14.04 LTS host that is running radvd:

Jun 28 13:15:33 myhost radvd[5782]:    do you need to add the UnicastOnly flag?
Jun 28 13:15:33 myhost radvd[5782]: interface ovsbr0v20p0 does not support multicast

At first, I was surprised, but after writing a small program, that checks for the IFF_MULTICAST flag in the interfaces attributes, I realized that the interface in fact does not support multicasts (or at least says so).

As it turns out, virtual interfaces added to an Open vSwitch bridge do not support multicasts in older versions of Open vSwitch (Ubuntu 14.04 LTS ships with Open vSwitch 2.0.2). I cannot tell for sure, in which version muticast support has been added. Looking at the changelog, it looks like this is present since Open vSwitch 2.4.0. Anyway, the version of Open vSwitch shipped with Ubuntu 16.04 LTS (Open vSwitch 2.5.0) supports multicasts on virtual interfaces and the IFF_MULTICAST flag is set for those interfaces.

This means that radvd should not have any problems when using an Open vSwitch virtual interface on Ubuntu 16.04 LTS.

Bug in the Apache Maven Javadoc Plugin

This afternoon, I spent several hours to figure out a problem that in the end turned out to be a bug in the Apache Maven Javadoc Plugin (version 2.10.3).

I wanted to use a custom stylesheet when building the Javadocs of all modules of a multi-module Maven project, so I generated a JAR that contained the stylesheet file, added it to the dependencies of the plugin and referenced it in the <stylesheetfile> tag.

To my suprise, Maven kept complaining with a message like

[WARNING] Unable to find the resource 'path/to/my/stylesheet.css'. Using default Javadoc resources.

I checked everything, tried various ways to configure the dependency, etc., but I could not get it to work. So I resorted to the last thing one can do when a software does not work as expected. I grabbed the source code of the plugin, found the relevant part that generated the message, and attached to the Maven process with a debugger. As it turned out, the problem was actually caused by a bug in the plugin that lead to resources from dependencies not being resolved correctly.

I filed a bug report and attached a patch to the bug report that fixes the problem for me. I hope that this patch will soon make it into a release version of the plugin. Until then, maybe this article helps someone else by saving the time to look for the cause of the issue.

UDP sockets broken again in Ubuntu 14.04 LTS

Some time ago, a regression was introduced into the 3.13 line kernel used by Ubuntu 14.04 LTS that broke UDP sockets when they were used in a certain way (e.g. like FreeRADIUS does). This bug was fixed in 3.13.0-67 and I hoped to never see it again.

Two days ago, I realized that one of our RADIUS servers was not working correctly any longer. I could not tell how long this problem had existed (the second RADIUS server still worked and in monitoring the primary one also worked, so the problem went undetected for a very long time).

After looking for the cause of the problem for quite some time, I remembered the problem described earlier and tried an old kernel version. Bingo! This fixed the problem. After looking at the changelog of the current 3.13 line kernel from trusty-proposed (that also fixes the problem) I found a reference to another bug report that describes the problem (don't be fooled by the bug's description, it also applies to IPv4).

As it turns out, the first regression had been caused by backporting an optimization regarding UDP checksum calculation from a newer Linux kernel. However, this change exposed a problem that had been fixed in the newer kernel but not in Ubuntu's branch of kernel 3.13. This regression was fixed by simply removing the patch again. This was okay because it was just an optimization.

Some time later, someone (who obviously was not aware of this regression) again thought that backporting the optimzation was a good idea, so it got reintroduced in 3.13.0-69. Now, it looks like they fixed the bug in 3.13.0-78 by actually fixing the underlying problem and not by removing the patch again. Therefore, I hope that we will not see the regression a third time. However, I am a bit annoyed that they did not do better testing when backporting the patch after there had already been a regression around it once. Maybe the Ubuntu team's decision to not use a kernel with long-term support and do maintenance themselves was not so wise after all.

Disabling the annoying "Visit ..." entry in the Firefox address-bar drop-down

I find the new address bar features introduced in a recent Firefox version very annoying. The suggestion of search terms can be disabled easily (does anyone really want to have everything entered into the address bar sent to an external service?), but this still leaves this annoying "Visit ..." entry at the top of the list of visited addresses.

This entry is annoying for several reasons:

  1. It does not add any functionality: Just hitting enter has (nearly) the same effect as selecting this entry.
  2. It can easily be selected accidentally when you actually want the top entry from the list of visited addresses.
  3. Typically, it does not suggest the address you actually want to visit for two reasons: First, it suggests visiting the top URL of the suggested site, even if you always visit a specific path. Second, it suggest a plain (HTTP) URL, even if the site actually only supports HTTPS and you never visited it with HTTP.

I have no idea, why they added such a stupid feature to Firefox at all (I suspect that it was originally designed for a different purpose that really only makes sense if you also enable the other features) and why they did not add an option to the UI for disabling it.

Fortunately, someone found out that it can be disabled by setting the browser.urlbar.unifiedcomplete option to false in about:config. Seeing how often the page with the solution has already been visited, I am definitely not the only person who is annoyed by this stupid new feature.